skaiuijing
前言 在上一篇博客中,我们使用SVC中断开启了第一个任务,这就是调度器的启动,接下来我们将在SVC工程的基础上,添加PendSV中断,进行切换任务从而实现多线程。
再次提醒:本节内容需要一定的arm架构功底才能完全看懂,但是ARM架构只是RTOS这片大海中微不足道的一小滴海水,也不存在所谓的必须懂ARM架构才能懂RTOS的说法!陷入微小的细节中是没有必要的!读者如果没接触过arm架构,不需要细究,把握RTOS的宏观思想才是最重要的!
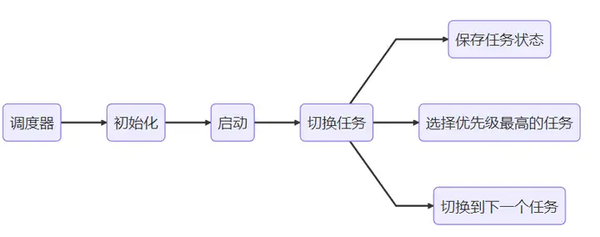
PendSV中断 根据前面的博客,我们已经知道了PendSV中断是上下文切换的真正场所,现在让我们利用PendSV中断实现上下文切换。
代码如下:
先在合适的地方加上这两行宏:
1
2
#define configMaxPriori 32 #define configShieldInterPriority 191
我们先在调度器启动的函数里配置中断:
1
2
3
4
5
6
7
8
9
10
11
12
13
14
15
16
17
18
19
20
21
void __attribute__( ( always_inline ) ) SchedulerStart( void ) { //添加这一行 ( *( ( volatile uint32_t * ) 0xe000ed20 ) ) |= ( ( ( uint32_t ) 255UL ) << 16UL ); /* Start the first task. */ __asm volatile ( " ldr r0, =0xE000ED08 \n"/* Use the NVIC offset register to locate the stack. */ " ldr r0, [r0] \n" " ldr r0, [r0] \n" " msr msp, r0 \n"/* Set the msp back to the start of the stack. */ " cpsie i \n"/* Globally enable interrupts. */ " cpsie f \n" " dsb \n" " isb \n" " svc 0 \n"/* System call to start first task. */ " nop \n" " .ltorg \n" ); }
PendSV:
我们要先保存上文,选择任务,再开启下文。
简单解释一下这些代码,其实如果读者看得懂SVC中断的过程,PendSV中断也大差不差:
当PendSV中断响应时,spsr,pc,(r14)lr,r12,r3,r2,r1,r0的值会被自动存储到任务栈中,有读者可能会好奇,这是怎么找到任务栈的呢?不要忘记了PSP!它会指向这个任务栈的栈顶,也就是说psp现在指向r0。
现在我们要手动保存stack中r0数据下面的值。
pxCurrentTCB指向的是TCB,也就是任务控制块,前一行代码,是将pxCurrentTCB这个指针的地址加载到r3;后一句,是将这个地址指向的内容加载到r2,也就是说,r2现在的内容就是pxCurrentTCB这个指针;如果再进行一次ldr操作,就能找到TCB了,读者可以去SVC调用的篇章看看。
cs和sp表示一个栈的双指针,这里是将r3压入栈,r3保存的是pxCurrentTCB指针的地址。这是为了防止r3在调用vTaskSwitchContext函数时被更改。
接下来的这几行代码笔者之前讲过,就是进入临界区,关闭异常和中断,防止被打断。
执行vTaskSwitchContext函数后再退出临界区。
之后是加载对应的任务栈的内容到寄存器,上下文切换是对称的。切换下文的内容可以参考SVC调用及之后的博客,读者看几遍就能理解了。
顺便一提,attribute ( ( naked ) )不要漏掉,这个关键字笔者还是不多赘述了,深究下去涉及到编译器对程序的处理,有兴趣的读者可以尝试看一下添或不添加这个关键字后的反汇编源码。
1
2
3
4
5
6
7
8
9
10
11
12
13
14
15
16
17
18
19
20
21
22
23
24
25
26
27
28
29
30
31
32
33
34
35
void __attribute__( ( naked ) ) xPortPendSVHandler( void ) { __asm volatile ( " mrs r0, psp \n" " isb \n" " \n" " ldr r3, pxCurrentTCBConst \n" " ldr r2, [r3] \n" " \n" " stmdb r0!, {r4-r11} \n" " str r0, [r2] \n" " \n" " stmdb sp!, {r3, r14} \n" " mov r0, %0 \n" " msr basepri, r0 \n" " dsb \n" " isb \n" " bl vTaskSwitchContext \n" " mov r0, #0 \n" " msr basepri, r0 \n" " ldmia sp!, {r3, r14} \n" " \n" " ldr r1, [r3] \n" " ldr r0, [r1] \n" " ldmia r0!, {r4-r11} \n" " msr psp, r0 \n" " isb \n" " bx r14 \n" " nop \n" " .align 4 \n" "pxCurrentTCBConst: .word pxCurrentTCB \n" ::"i" ( configShieldInterPriority ) ); }
由于现在还不支持多优先级,因此采用轮询机制选择任务:
1
2
3
4
5
6
7
uint32_t x = 0; void vTaskSwitchContext( void ) { x++; pxCurrentTCB = TcbTaskTable[ x %3 ]; }
现在我们需要加入就绪表和上下文切换的触发函数了。
在定义SVC_Handler的地方加上这几行:
switchTask是用来触发PendSV中断,往对应的地址位写入1即可,读者有兴趣可以查阅arm cm3手册,笔者不过多赘述:
1
2
3
4
5
6
7
8
9
#define switchTask()\ *( ( volatile uint32_t * ) 0xe000ed04 ) = 1UL << 28UL; TaskHandle_t TcbTaskTable[configMaxPriori]; #define vPortSVCHandler SVC_Handler #define xPortPendSVHandler PendSV_Handler
小小更改一下创建任务的函数:
1
2
3
4
5
6
7
8
9
10
11
12
13
14
15
16
17
18
19
20
21
void xTaskCreate( TaskFunction_t pxTaskCode, const uint16_t usStackDepth, void * const pvParameters,//You can use it for debugging uint32_t uxPriority, TaskHandle_t * const self ) { uint32_t *topStack =NULL; TCB_t *NewTcb = (TCB_t *)heap_malloc(sizeof(TCB_t *)); *self = ( TCB_t *) NewTcb; TcbTaskTable[uxPriority] = NewTcb;//添加这一行 NewTcb->uxPriority = uxPriority; NewTcb->pxStack = ( uint32_t *) heap_malloc( ( ( ( size_t ) usStackDepth ) * sizeof( uint32_t * ) ) ); topStack = NewTcb->pxStack + (usStackDepth - (uint32_t)1) ; topStack = ( uint32_t *) (((uint32_t)topStack) & (~((uint32_t) aligment_byte))); NewTcb->pxTopOfStack = pxPortInitialiseStack(topStack,pxTaskCode,pvParameters,self); pxCurrentTCB = NewTcb; }
在此之前,记得把空闲任务的内容更改,因为我们这次的实验还是点灯:
1
2
3
4
5
6
7
8
9
10
11
12
13
14
15
16
void EnterSleepMode(void) { //什么都不做 } //Task handle can be hide, but in order to debug, it must be created manually by the user TaskHandle_t leisureTcb = NULL; void leisureTask( ) {//leisureTask content can be manually modified as needed while (1) { switchTask();//自动轮询到下一个 } }
现在我们可以添加多个任务了,把main函数这一块改成这样:
1
2
3
4
5
6
7
8
9
10
11
12
13
14
15
16
17
18
19
20
21
22
23
24
25
26
27
28
29
30
31
32
33
34
35
36
37
38
39
40
41
42
43
44
45
46
47
48
49
50
51
52
53
54
55
56
57
58
59
60
61
62
63
//Task Area!The user must create task handle manually because of debugging and specification TaskHandle_t tcbTask1 = NULL; TaskHandle_t tcbTask2 = NULL; void led_bright( ) { while (1) { HAL_GPIO_WritePin(GPIOC, GPIO_PIN_13, GPIO_PIN_RESET); HAL_Delay(1000); switchTask(); } } void led_extinguish( ) { while (1) { HAL_GPIO_WritePin(GPIOC, GPIO_PIN_13, GPIO_PIN_SET); HAL_Delay(500); switchTask(); } } void APP( ) { xTaskCreate( led_bright, 128, NULL, 1, &tcbTask1 ); xTaskCreate( led_extinguish, 128, NULL, 2, &tcbTask2 ); } int main(void) { HAL_Init(); SystemClock_Config(); MX_GPIO_Init(); SchedulerInit(); APP(); SchedulerStart(); while (1) { } }
实验验证 读者在完成以上这些后,可以编译下载到stm32f103c8t6最小系统板中。实验现象为开发板上的灯不断闪烁。
总结 完成了PendSV中断的代码,并且引入任务就绪表。通过PendSV中断不断进行上下文切换,从而实现多线程。
本章的实验工程文件放在:skaiui2/SKRTOS_sparrow at experiment
有需要的读者可以自取。